
The Image Generator turns a sentence into a finished, on-brand image. Describe what you want — a product shot, a lifestyle scene, a social graphic — and Darwin generates it in your colors and style, sized to the exact pixels of wherever you’re posting. It’s the quickest way to get a professional image without a camera or a designer.
Because it’s part of Creative Suite, every image starts from your brand and can be built around your real product. You control the look from a settings panel on the right, see the exact credit cost before you commit, and everything you make is saved to your library.
Where to find it: Left menu → Marketing → Creative Studio → Media → Generate tab → Image.
How it works
Pick Image and you land on a prompt screen. Type what you want in the box (“Describe the image you want to create…”) or start from a quick chip — Product shot, Lifestyle, or Ad creative. Everything about the output — the kind of image, its size, quality, and how many you get — is set in the General settings panel on the right, and the running credit cost is always shown at the bottom.
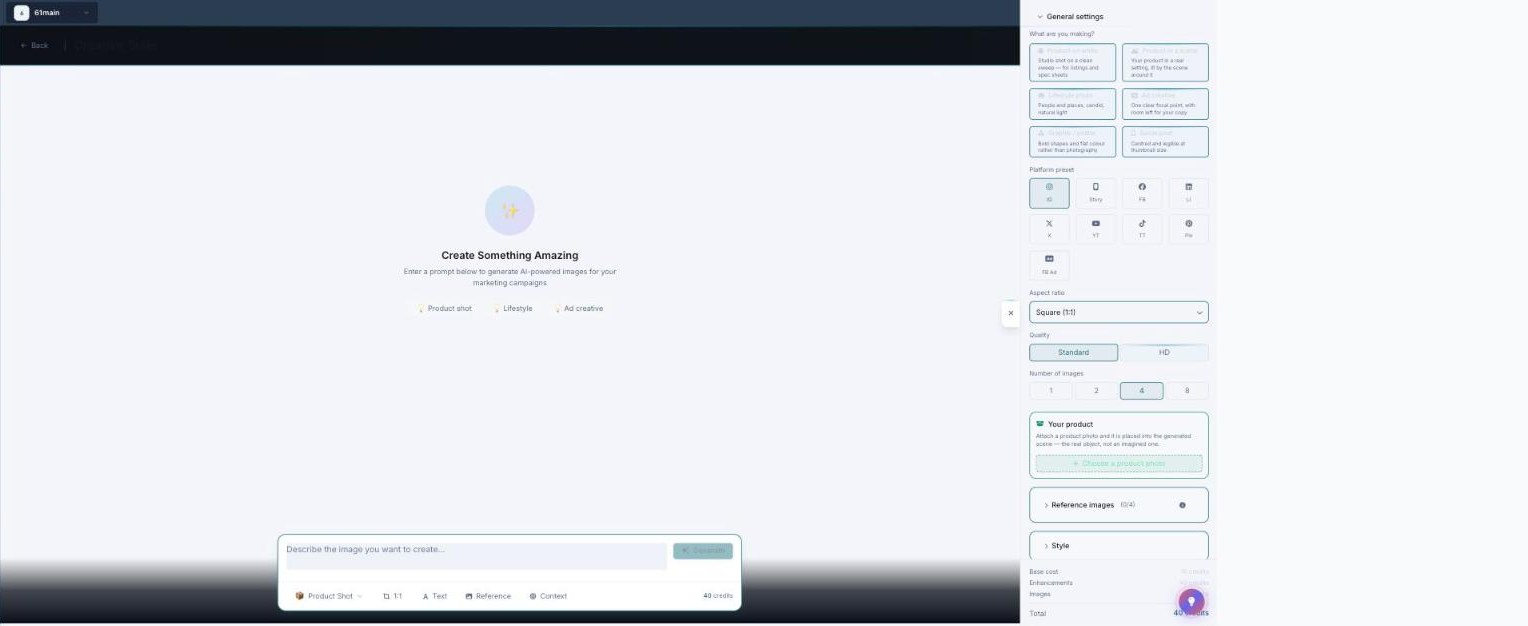
The image generator — a prompt on the left, and full control on the right with a live credit total at the bottom.
What are you making — six ready-made recipes
The first choice does the most work. Each “What are you making” tile is a recipe that sets the image style, the framing, the quality, and a sensible starting size all at once — so you get the right kind of image without knowing any of the technical settings. Pick one, then tweak anything you like underneath.
| Recipe | What it makes | Starts at |
|---|---|---|
| Product on white | Studio shot on a clean sweep — sharp product, soft light, a real contact shadow. Best for listings and spec sheets. | HD · Square |
| Product in a scene | Your product in a real setting, lit by the scene around it, in correct scale — still the clear subject. | HD · Square |
| Lifestyle photo | People and places, candid, natural light — the product in natural use. | Standard · 4:5 |
| Ad creative | One clear focal point with generous margins for your copy — an advertising key visual. | HD · 1.91:1 |
| Graphic / poster | Bold shapes and flat color rather than photography. | HD · Square |
| Social post | Centered and legible at thumbnail size — built for the feed. | Standard · Square |
Not sure which to pick? Product in a scene is the most versatile for e-commerce — it drops your real product into a believable setting. Use Ad creative whenever you’ll add a headline or offer on top.
Set the size — platform presets & aspect ratio
Marketing Titan sizes every image to the exact pixels each channel expects, so you never post something that gets cropped badly. Pick a Platform preset and the shape is chosen for you; use Aspect ratio only if you want to override it.
| Platform preset | Shape | Delivered at |
|---|---|---|
| IG (Instagram) | 1:1 square | 1080 × 1080 |
| Story | 9:16 tall | 1080 × 1920 |
| FB (Facebook) | 1:1 square | 1080 × 1080 |
| 1:1 square | 1080 × 1080 | |
| X (Twitter) | 16:9 wide | 1200 × 675 |
| YouTube | 16:9 wide | 1920 × 1080 |
| TikTok | 9:16 tall | 1080 × 1920 |
| 2:3 tall | 1000 × 1500 | |
| FB Ad | 1.91:1 wide | 1200 × 628 |
Want a shape that isn’t tied to a platform? The Aspect ratio menu offers 1:1, 4:5, 2:3, 3:4, 9:16, 16:9, 4:3, 3:2, 5:4, and 1.91:1. Darwin generates the image and then cover-crops it to the exact delivery pixels, so what you download drops straight into the placement.
The rest of the settings, one by one
| Setting | What it does |
|---|---|
| Quality — Standard or HD | HD renders in a higher-detail mode and automatically runs a 2× sharpening pass, so the image is crisper and larger — it costs a few extra credits per image. Standard is faster and perfect for everyday posts. |
| Number of images | Generate 1, 2, 4, or 8 options in one run and keep the best. The credit cost scales with the count (4 is the default). |
| Your product | Attach a product photo and the real item is placed into the generated scene — not an AI look-alike. Two modes: New scene (place the product into a fresh scene) or Swap background (keep the product, replace only its background). |
| Reference images | Add up to 4 images to steer the style, composition, or mood. References guide the look, not the exact content. (If one can’t be applied, you’re told and it generates without it.) |
| Style | A quick Style preset (Auto, Brand, Vibrant, Minimal) plus a Style menu (Realistic, Cinematic, Design, Illustration, Watercolour, 3D, Anime, and more) that adds a matching treatment — e.g. Cinematic gives dramatic lighting and a film-still feel. |
Your product vs a reference image — the key difference
A reference image only influences the look — a color palette, a composition, a mood. Your product is different: the actual object you upload must survive into the final image, composited into the scene as the real thing. That’s the difference between “a photo of a bottle” and “a photo of your bottle.”
Headlines are added as real text — never misspelled
When your image needs a headline, subheadline, or call-to-action, Darwin adds it as a real text layer over the picture rather than asking the AI to “draw” the words. That’s why the text is always spelled correctly, on-brand, and crisp — a common failure with raw image AI that Marketing Titan avoids by design.
Generate an image, step by step
- Choose a What are you making recipe (e.g. Product in a scene).
- Pick a Platform preset so the size is right for your channel — or set a custom Aspect ratio.
- Set Quality (Standard or HD) and how many images you want.
- Optional: attach Your product so the real item appears, and add Reference images for the look.
- Write your prompt — between 10 and 500 characters, and the more specific, the better.
- Check the credit total at the bottom of the panel, then click Generate.
- Images stream in live as they finish (you can cancel mid-run and get your credits back). Keep the ones you like — they save to My Assets — then post or download.
Usage & credits
Generating uses credits, and the cost is always shown before you commit — the panel breaks it into Base cost, Enhancements, and Images, adding up to a Total that updates as you change settings. Your remaining balance sits in the top-right corner of Creative Studio.
| Action | Credits |
|---|---|
| Generate an image (base) | 10 per image |
| HD / Upscale 2× | +5 per image |
| Remove background | 3 per image |
| Add logo | 2 per image |
The math is simple: Total = (10 + any enhancements) × number of images. So four Standard images is 40 credits; four in HD is 60 (the HD upscale adds 5 each). If you cancel a run partway through, the unused credits are refunded, and the balance is always checked before a run starts — you’ll never begin one you can’t finish.
- More images = more credits. Generating 8 options costs more than 1 — great when you want choice, but set it to 1–2 for quick tries.
- HD costs more than Standard. Use HD for hero images and print; Standard is fine for quick social posts.
- Enhancements add credits per image. Remove background, upscale, and add-logo each show up in the breakdown before you commit.
Set Number of images to 4 in Standard on your first prompt to see a range of looks, then regenerate just the winner in HD. You spend far fewer credits than generating everything in HD up front.
Enhance existing assets
Already made an image? You don’t need to regenerate it to fix it. On the Generate tab, click Enhance existing assets and your My Assets library opens in enhance mode. Hover any image to Upscale it or Remove its background, or multi-select several for a bulk run — much cheaper than starting over.
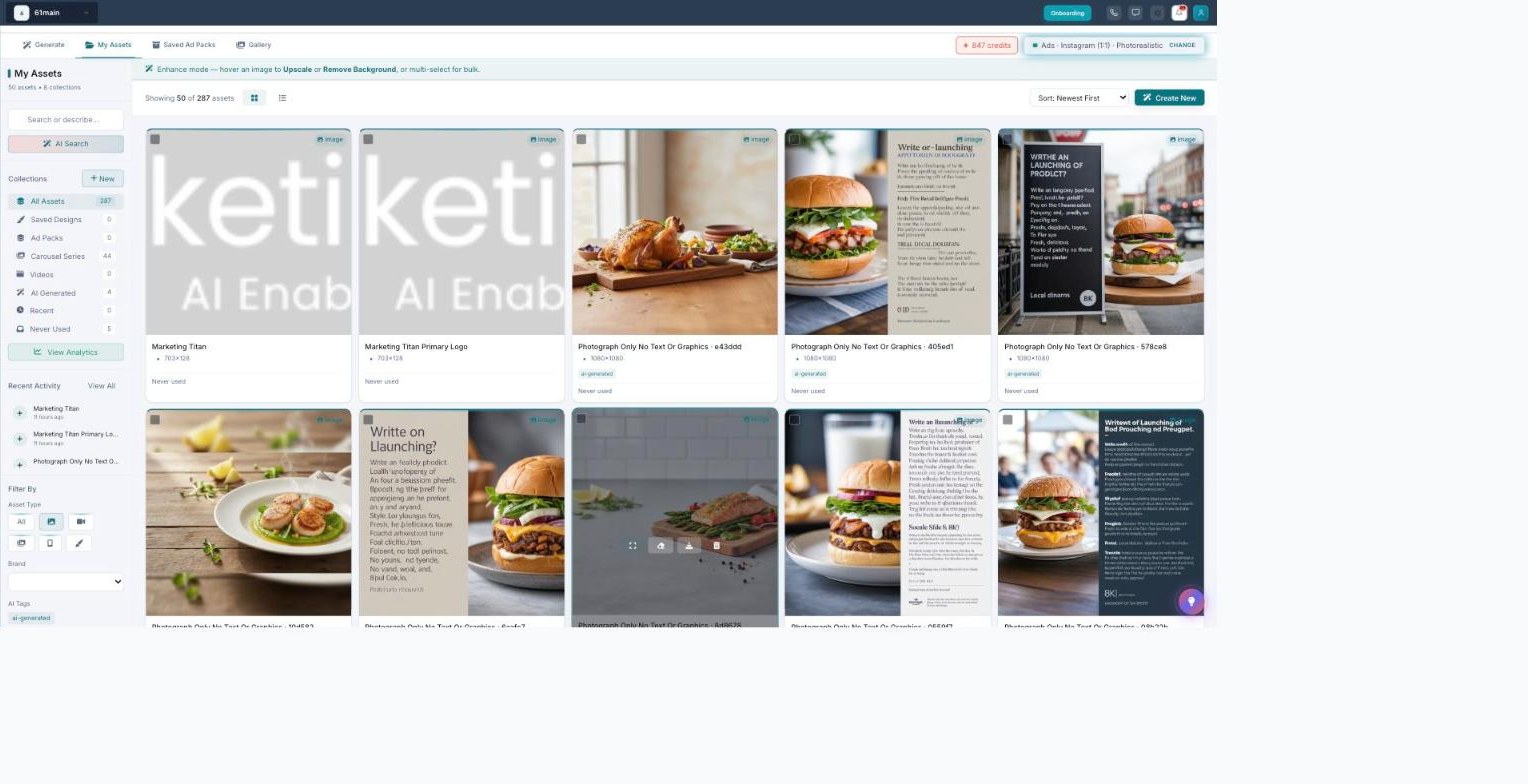
Enhance existing assets — hover any image to Upscale or Remove Background, or select several for a bulk run.
| Enhancement | What it does | Credits |
|---|---|---|
| Upscale 2× | Doubles the resolution for sharper, larger output — good for hero images and print. | 5 per image |
| Remove background | Cuts out the subject cleanly onto a transparent background. | 3 per image |
Common questions
Can I use my own product photo?
Yes — attach it under Your product and the real item is placed into the generated scene. Choose New scene to build a fresh setting around it, or Swap background to keep the product and only change what’s behind it.
How do I get the right size for Instagram vs a Story?
Pick the Platform preset (IG, Story, and so on) and the exact pixel size is set for you — 1080×1080 for IG, 1080×1920 for a Story. You can still override the shape under Aspect ratio.
What’s the difference between Standard and HD?
HD renders in a higher-detail mode and adds an automatic 2× sharpening pass, so it’s crisper and larger — and costs 5 more credits per image. Use HD for hero images; Standard for everyday posts.
How much will it cost before I generate?
The total is shown at the bottom of the settings panel (Base cost + Enhancements + Images) and updates live as you change quality and image count — so there are no surprises. Cancel a run and unused credits are refunded.
Will the text on my image be spelled correctly?
Yes. Headlines, subheadlines, and CTAs are added as real text layers over the image, not drawn by the AI — so they’re always spelled right and on-brand.
Where do my generated images go?
Into My Assets, in the AI Generated collection, where you can search, filter, reuse, and enhance them.
Having trouble? If Generate is disabled, check your credit balance in the top-right corner. If the result ignores your product, confirm you attached it under Your product before generating. If a prompt is rejected, keep it between 10 and 500 characters. If the look is off-brand, make sure the correct brand is selected in your workspace.
What’s next
- Pick a recipe, choose a platform, write a prompt, and generate your first image.
- Attach a product photo to place your real item into a scene.
- Generate 4 in Standard, then re-run the winner in HD.
- Use Enhance existing assets to upscale or remove a background on images you’ve already made.
- Find everything you’ve made in My Assets.